These easy mummy rice krispie treats are the perfect Halloween recipe! Made with just 4 ingredients and ready in 30 minutes, these cute Halloween treats are perfect for parties, kids, and anyone who loves a simple no-bake dessert.
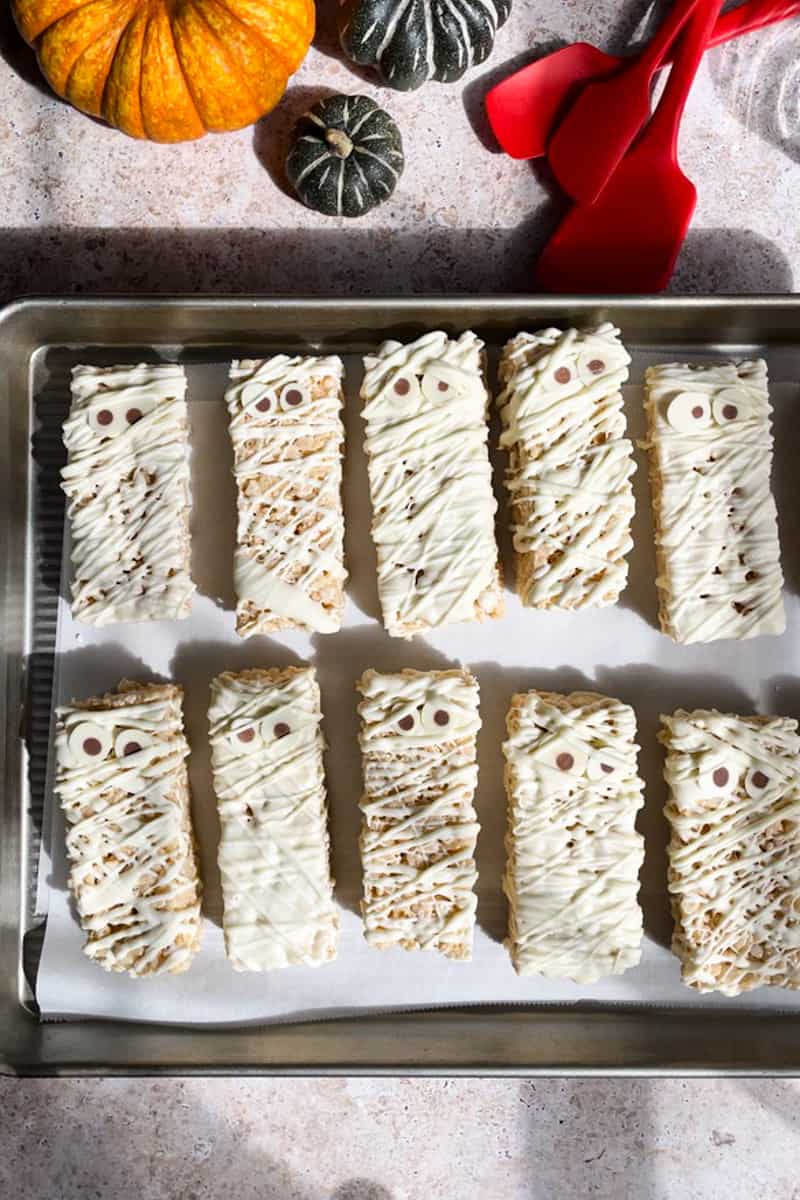
Looking for an easy Halloween treat that looks extravagant and impressive but is actually super simple to make? These mummy rice krispie treats are exactly what you need! They’re the perfect combination of cute and delicious. Crispy rice cereal treats covered in white chocolate and decorated to look like adorably spooky lil mummies.
This recipe uses my copycat Disney Rice Krispie treats as the base (because they really do taste different on Main Street USA!) but you can also use store-bought rice krispie treats to make it even easier.
why this mummy rice krispie recipe works:
🎃 Halloween-ready. These treats are the perfect spooky addition to any Halloween event, from a movie night to a Halloween night party!
👻 kid-friendly. This recipe is perfect to make with kids in the kitchen because it actually helps to be a little messy!
🙌 no bake. No baking required means you can whip up a batch quickly and easily, even the night before a spirited event!
🛒 ingredients

See the recipe card for the exact quantities.
🍳 step-by-step process for making
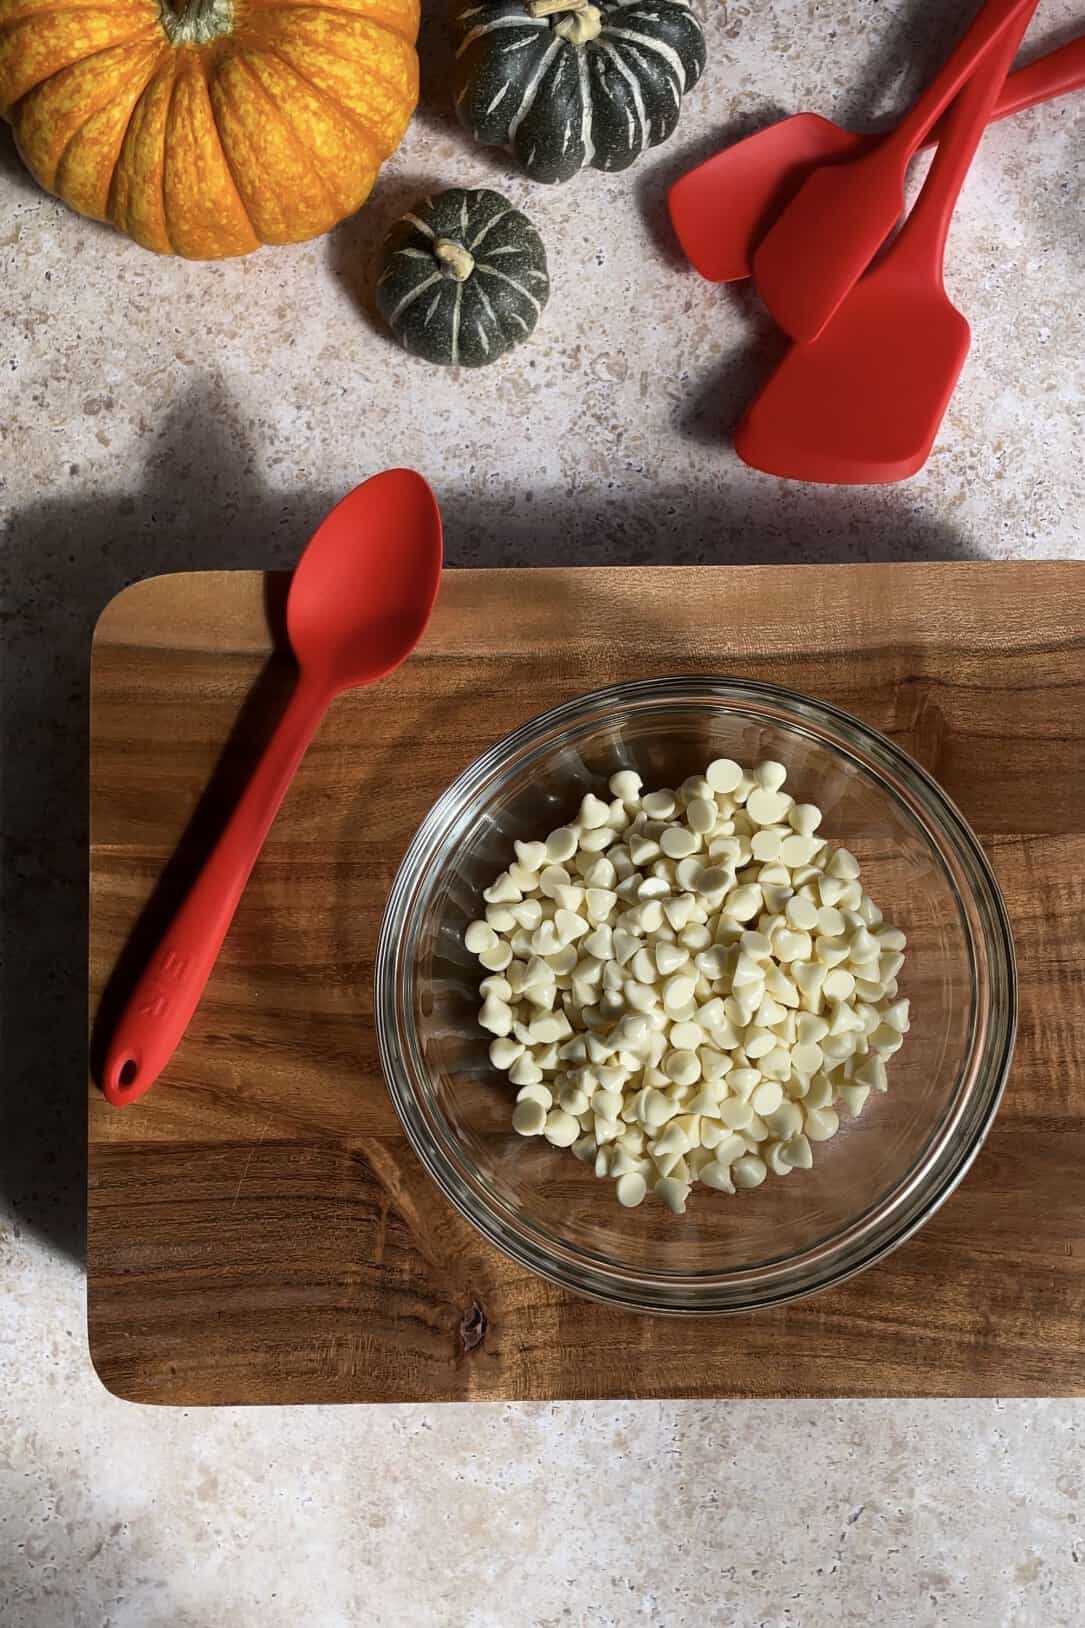
Step 1: Melt your chocolate chips in a microwave-safe bowl at 50% power for 1-2 minutes.
You can do this in 30-second intervals if you’re responsible.
I chose to just nuke it and take my chances. 🤡
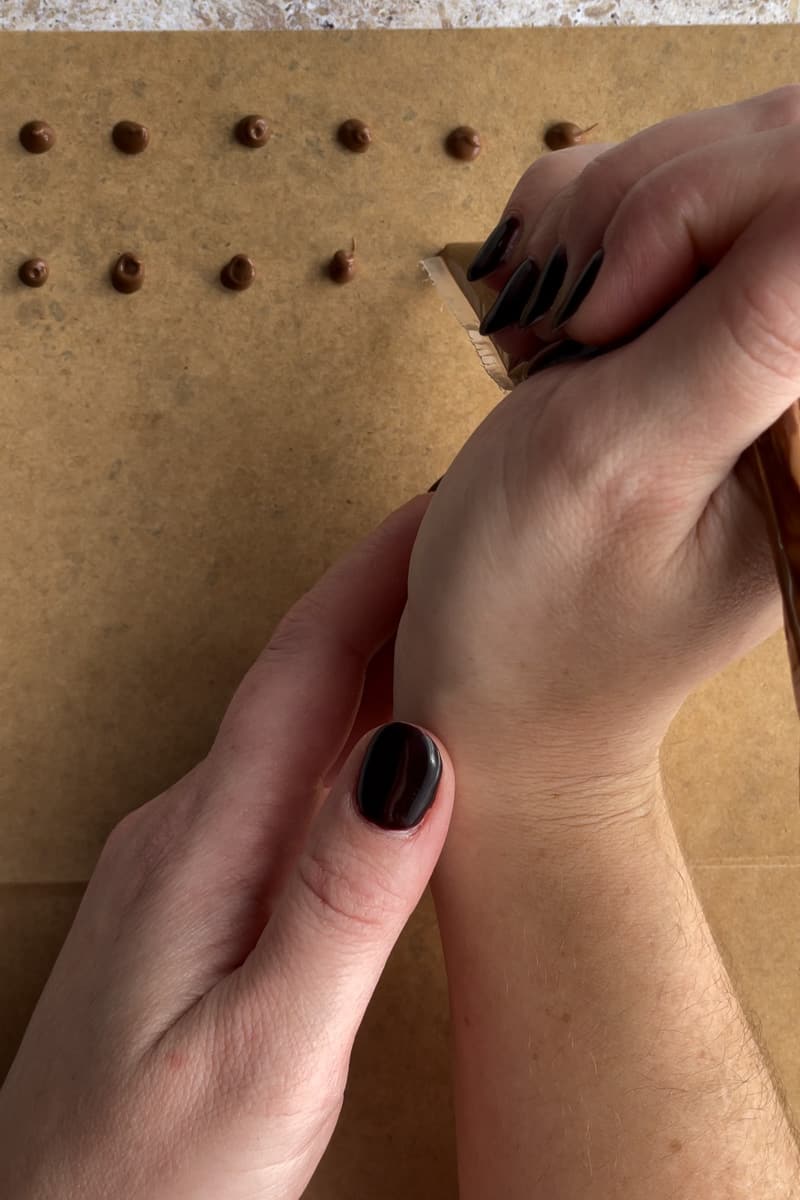
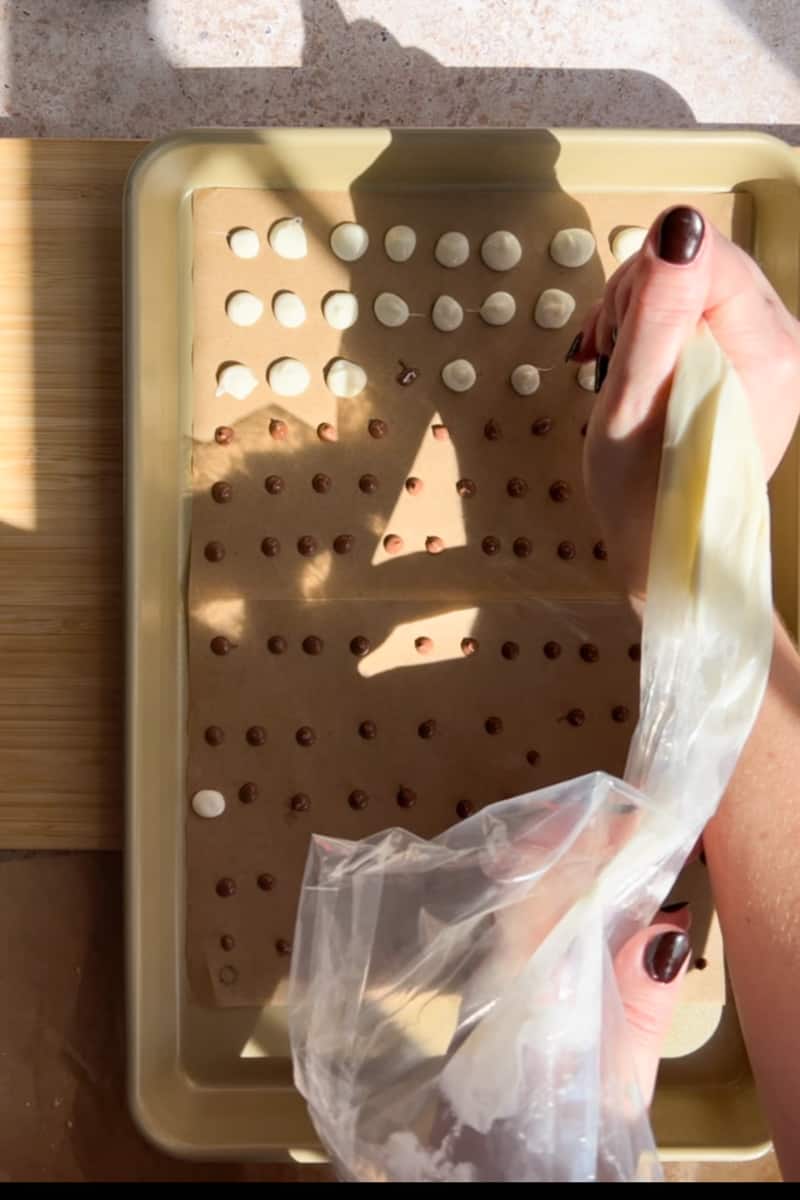
Step 2: Make the eyeballs first. Put your chocolate chips into a piping bag and snip the corner so you have a very small hole, about 1/8” in diameter.
Pipe out small chocolate dots about 1/4 inch apart onto a sheet of parchment paper on a small baking sheet. You’ll need 24 dots for 12 pairs of eyeballs.
Give the pan a little jiggle to let any pointy tips settle down into a round circle. Pop the pan into the fridge to let the chocolate set for a few minutes.
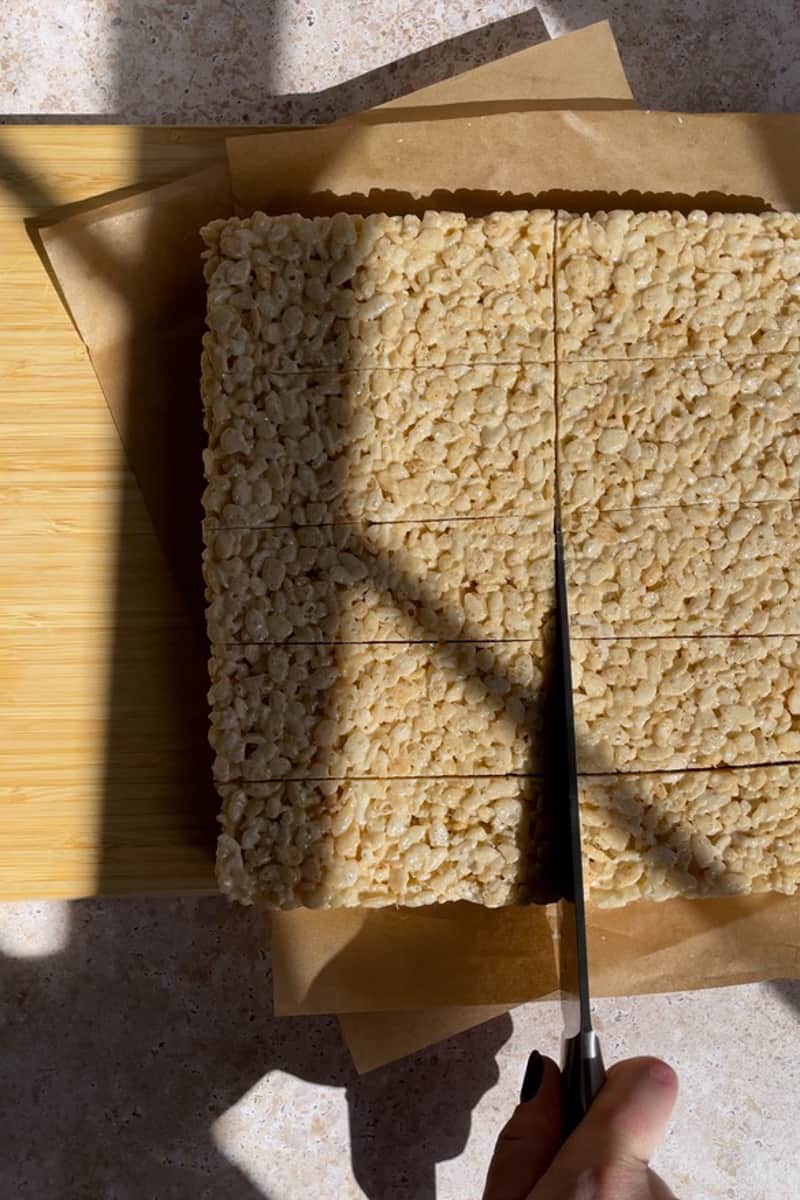
Step 3: Cut your krispie treats into 12 long sticks.
Step 4: Stir your melted white chocolate chips to create a smooth bowl of melted chocolate. Place approximately 2 TBSP into a piping bag to finish the eyeballs.
Leave the rest in the bowl.
Step 5: To finish the eyeballs, take the pan out of the fridge and carefully pipe white chocolate overtop of the milk chocolate.
Make sure to fully cover the dots.
It’s okay if some pairs of eyeballs stick together, they will make a complete pair that look different than the other mummies!
Pop the pan back into the fridge to let the eyeballs set up fully.
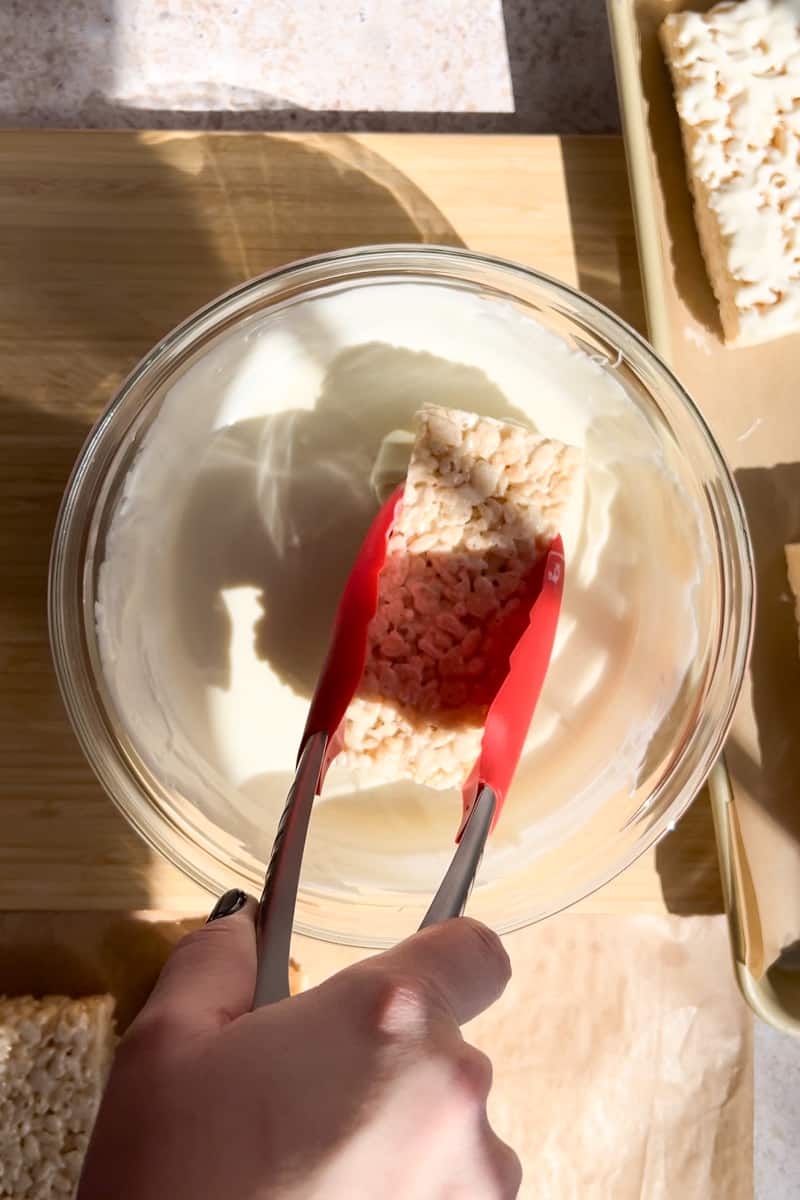
Step 6: Dip 6 of the rice krispies into the melted white chocolate using tongs.
Set them off to the side to allow the chocolate to set up and harden.
If it’s hot in your kitchen like it was in mine (Florida problems), you can put them on a baking sheet and put them in the fridge or freezer to harden for a few minutes.
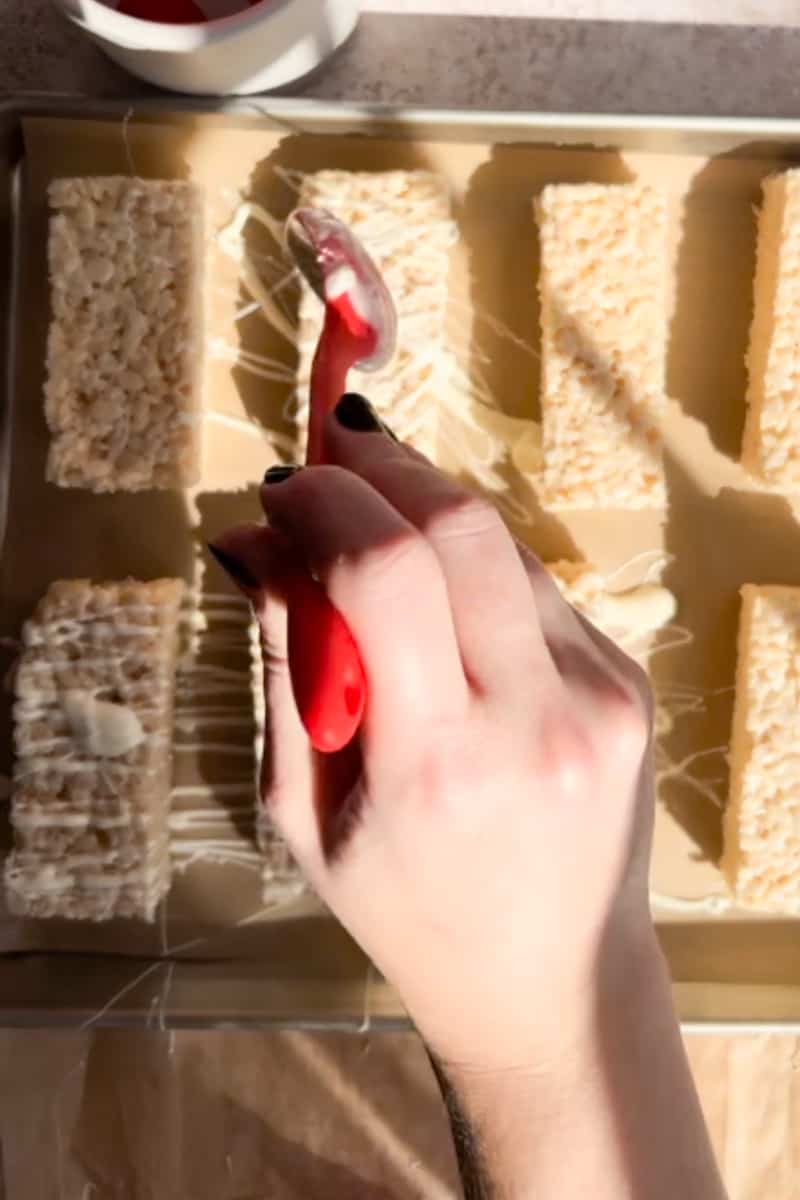
Step 7: Drizzle white chocolate on the other 6 treats to make a mummy wrapping design.
Go crazy here! Try going side to side, then diagonally for the best look!
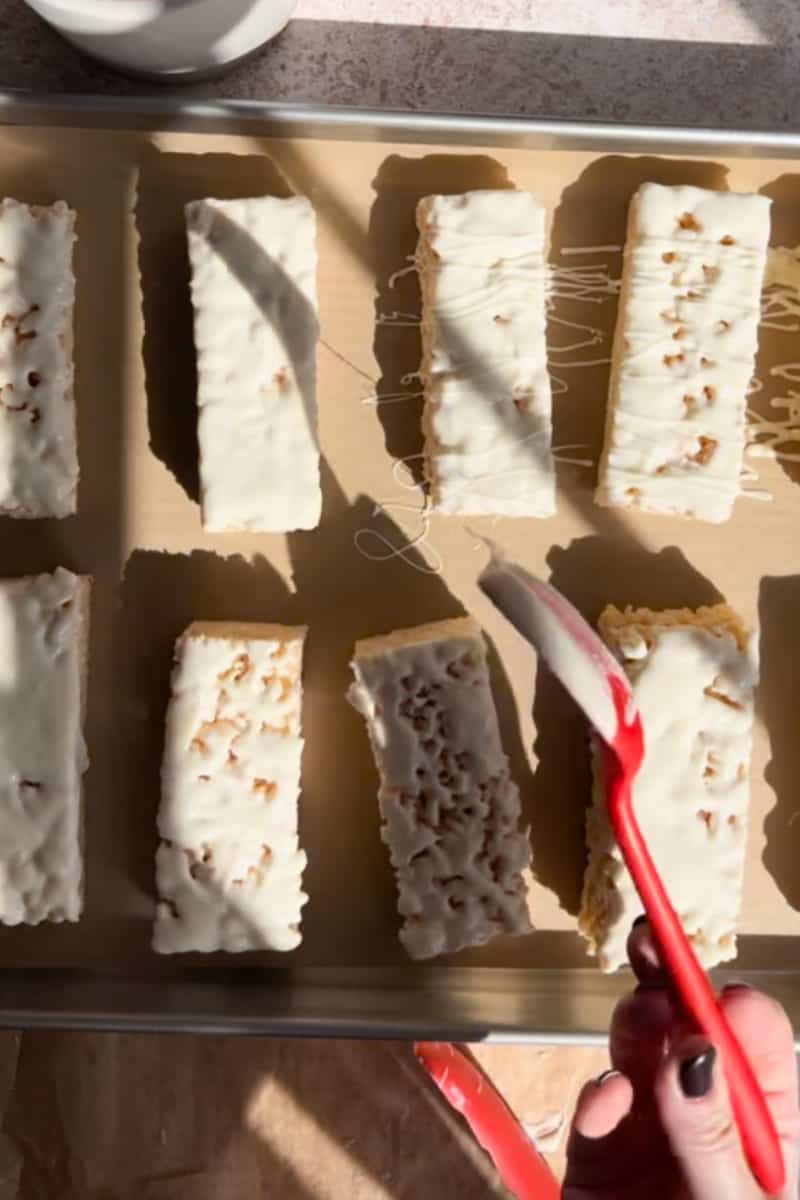
Step 8: If desired, drizzle mummy wrapping on the other treats that you dipped into the chocolate.
This adds another layer of dimension to the treats!
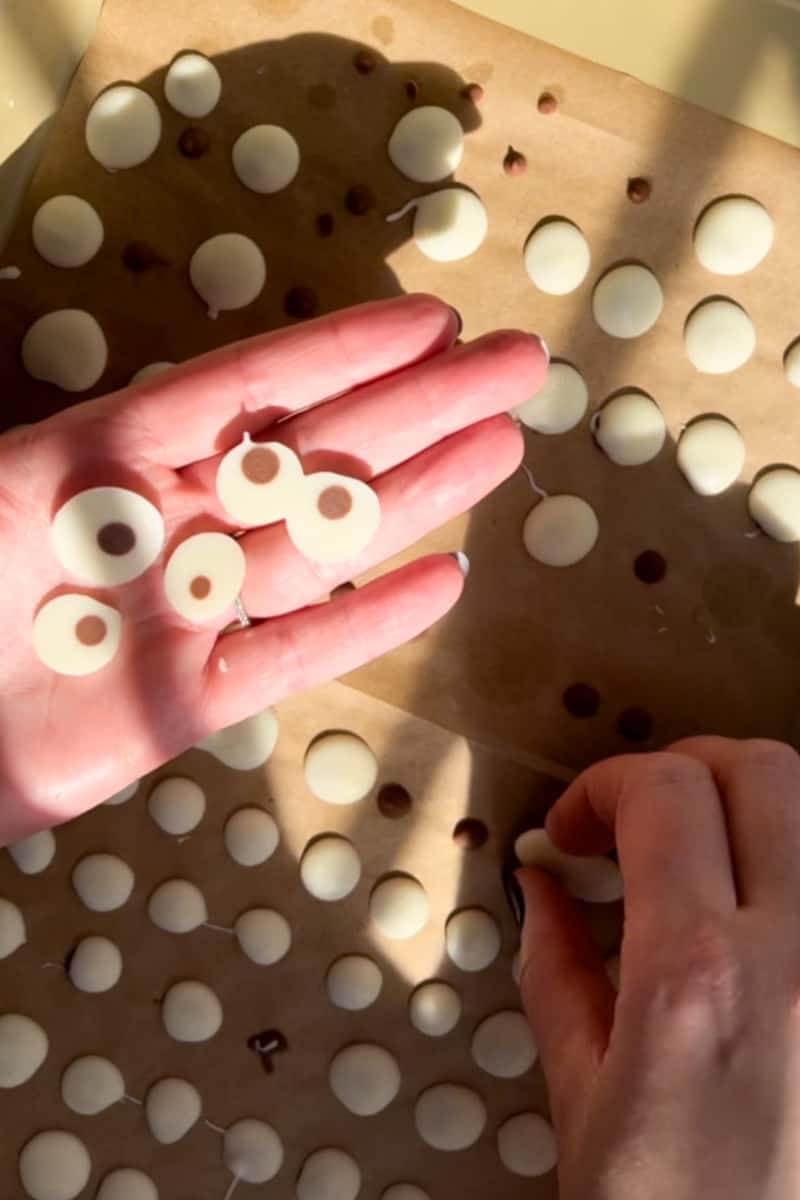
Step 9: Take the eyeballs off the parchment by carefully flipping them off, and place them onto the treats with a small dab of white chocolate to secure them.
If your chocolate is still melty, like mine was, you don’t need to dab on additional chocolate.
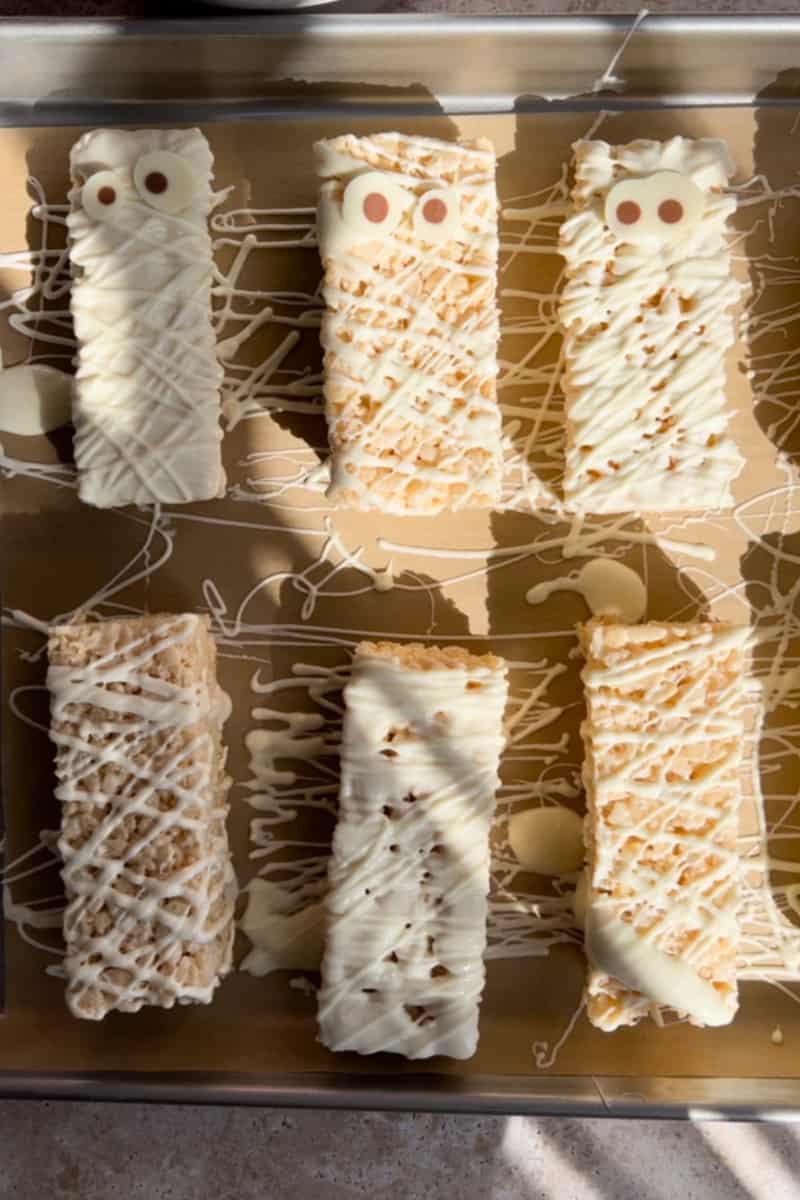
Step 10: Drizzle additional chocolate around the eyeballs to make it look like they are “wrapped up” with their eyes peeking out!
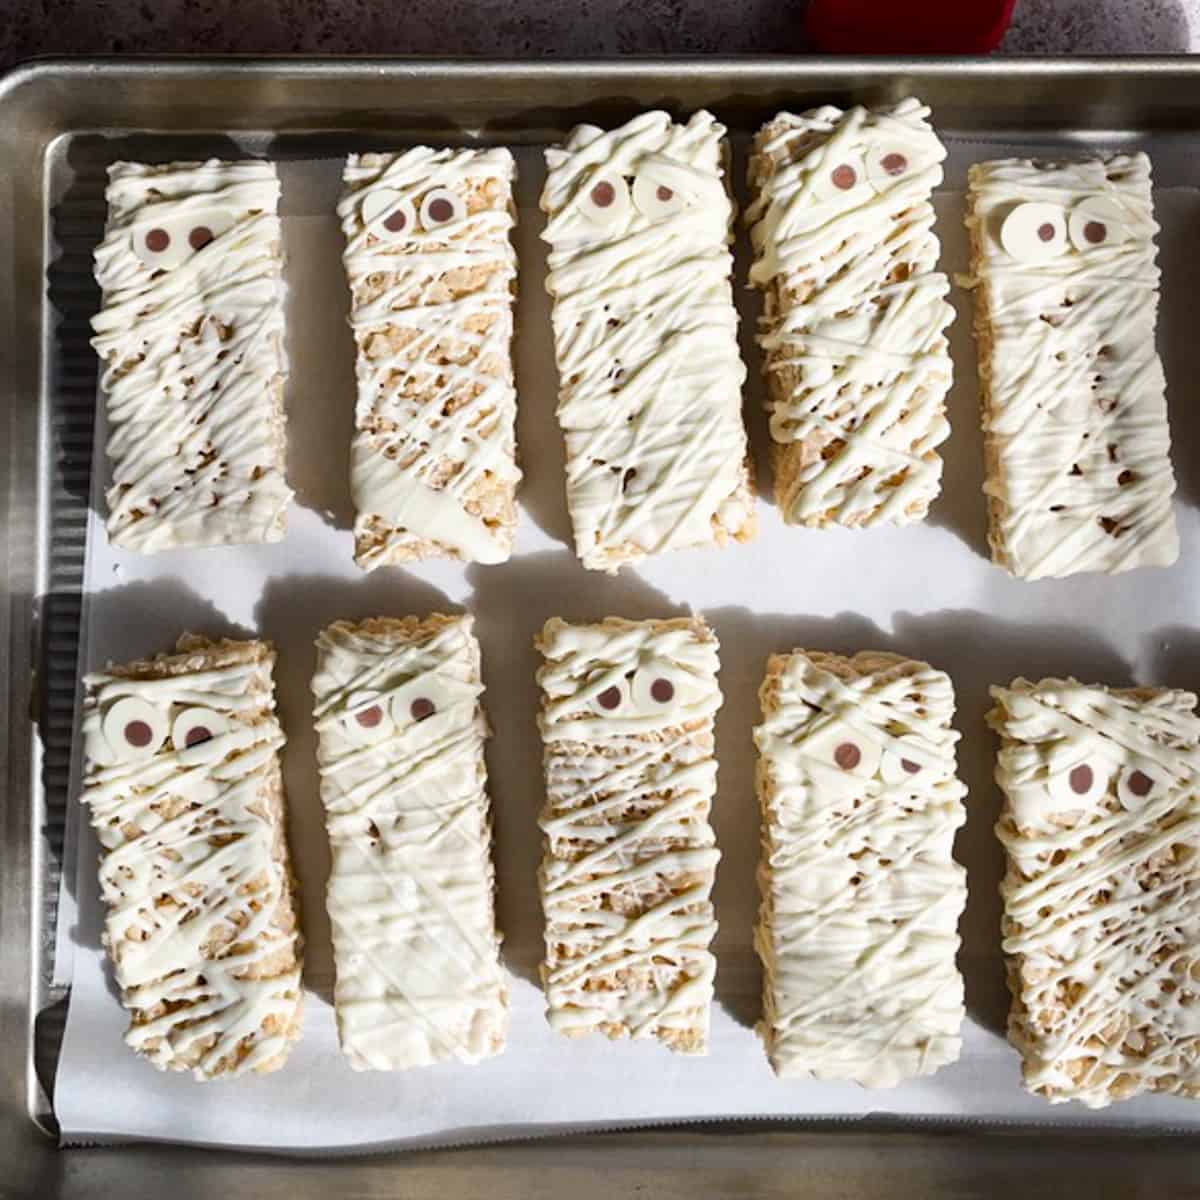
Once you are finished, set them aside and allow them to fully harden before storing or serving them.
Hint: Allow the mummies to fully harden. This could take a couple hours depending on the temperature of your home. If you are in a hurry, you can pop them into the fridge.
Wanna save this recipe for later? 📬
💡tips & tricks for getting it right
🍽️ serving tips
- These treats are perfect for serving at Halloween parties or at-home movie nights alongside a glass of pumpkin spice soda or candy corn soda!
- Add them to a dessert spread for your parties, or serve them on a spooky platter alongside some Halloween candy!
- Pack them into lunch boxes for a fun treat during the week of Halloween or month of October!
ℹ️ troubleshooting tips
- too melty – if your chocolate is too melty, pop your krispie treats into the fridge or freezer for a few minutes until they set up and harden. In order for them to properly harden back into the same texture as white chocolate chips, you’ll need to leave them alone for up to a few hours, which can be hard to do!
- too sticky – if your krispie treats are too sticky and hard to cut, you might not have let them set up long enough.
- mummy wrapping not defined – if your lines of mummy wrapping don’t seem to be defined on your treats, you could be drizzling the chocolate on too thick. Also, make sure to let the treats you dip cool completely before trying to drizzle additional chocolate on them. Pop them in the freezer while you drizzle the other treats so the white chocolate sets and creates a hardened base for the next layer of drizzles!
🔆 top tip
Make sure to allow the chocolate to harden between steps so you get the best definition of your mummy wrapping!
♻️ customize your Mummy treats
- chocolate mummies – use cocoa krispies for a chocolate variation of these mummies! You can also use chocolate chips to dip the mummies instead of white chocolate.
- ghosts – round the corners of the krispie treats and fully dip them to make ghost rice krispie treats!
- candy eyes – buy a package of candy eyes instead of making your own chocolate eye balls!
- store-bought treats – you can use store-bought rice krispie treats instead of making your own to cut down on the time and make it even easier to decorate.
- use another cereal – you can use another cereal instead of rice krispies to make your treats! Cinnamon toast crunch would also be delicious!
🧰 equipment needed & storage tips
🫙 how to store your Halloween rice krispie treats
Store your finished treats in an airtight container for up to 1 week, if they last that long!
💬 q+a
What kind of chocolate should I use for the mummies?
Use white chocolate chips, not white chocoalte in a bar, so that it sets back up and keeps its shape.
What if I don’t have pastry bags?
You can cut the corner off of a ziplock bag and use it as a piping bag, or you can use a piece of parchment paper or wax paper rolled into a cone to make the eyes.
How long does it take for the chocolate to cool and harden?
It can take anywhere from 15 minutes to two hours depending on the temperature and humidity of your kitchen for the chocolate to harden. I like to pop my treats into the fridge or freezer to speed up the cooling proecess of the white chocolate.
If you make this recipe, please leave a review in the comments and a star rating!
⭐️⭐️⭐️⭐️⭐️
I read every single comment, and each rating is helpful to other readers, too! 🥹
I also love connecting on social media, so snap a pic and hashtag it #myrecipeforfun and tag me on YouTube, TikTok, Threads, or pin this recipe on Pinterest!
Easy Mummy Rice Krispie Treats (Halloween Recipe)
Wanna save this recipe for later? 📬
Equipment
- 1 knife
- 2 microwave-safe bowls
- tongs
- spoons, spatulas, or whisks
- 2 pastry piping bags
- baking sheets
- parchment paper
Ingredients
- 1 batch Rice Krispie Treats Or 12 store-bought treats.
- 312 g White Chocolate Chips 1 bag
- 43 g Milk Chocolate Chips 1/4 cup
Instructions
To Make the Eyeballs
- Melt chocolate. Melt your chocolate chips in a microwave safe bowl at 50% power for 1-2 minutes in 30-second intervals until the chocolate is melted.
- Prep piping bag. Put your melted chocolate chips into a piping bag and snip the corner so you have a very small hole, about 1/8” in diameter.
- Pipe chocolate. Pipe out small chocolate dots about 1/4 inch apart onto a sheet of parchment paper on a small baking sheet. You’ll need 24 dots for 12 pairs of eyeballs.
- Chill chocolate. Give the pan a little jiggle to let any pointy tips settle down into a round circle. Pop the pan into the fridge to let the chocolate set for a few minutes
- Melt white chocolate. After the milk chocolate has set, finish the eyeballs using the melted white chocolate.
- Prep piping bag. Stir your melted white chocolate chips to create a smooth bowl of melted chocolate. Place aproximately 2 TBSP into a piping bag to finish the eyeballs. Leave the rest in the bowl and set it aside for later.
- Pipe white chocolate overtop milk chocolate. Take the pan out of the fridge and carefully pipe white chocolate overtop of the milk chocolate. Make sure to fully cover the dots. It’s okay if some pairs of eyeballs stick together, they will make a complete pair that look different than the other mummies!
- Chill to set. Pop the pan back into the fridge to let the eyeballs set up fully.
To Decorate the Krispie Treats
- Slice treats. Cut your krispie treats into 12 long sticks.
- Dip treats. Dip 6 of the rice krispies into the melted white chocolate using tongs. You may need to reheat the chocolate if it is too thick in consistency.
- Allow chocolate to set. Set the dipped treats off to the side to allow the chocolate to set up and harden. If it’s hot in your kitchen, you can put them on a baking sheet and put them in the fridge or freezer to harden for a few minutes.
- Drizzle to decorate. Drizzle white chocolate on the other 6 treats to make a mummy wrapping design. Go crazy here! Try going side to side, then diagonally for the best look! Drizzle mummy wrapping on the other treats that you dipped into the chocolate. This adds another layer of dimension to the treats!
- Place eyes. Take the eyeballs off the parchment by carefully flipping them off, and place them onto the treats with a small dab of white chocolate to secure them. If your chocolate is still melty, you don’t need to dab on additional chocolate.
- Finishing touches. Drizzle additional chocolate around the eyeballs to make it look like they are “wrapped up” with their eyes peeking out!
- Allow chocolate to set. Allow the mummies to fully harden. This could take a couple hours depending on the temperature of your home. If you are in a hurry, you can pop them into the fridge.