


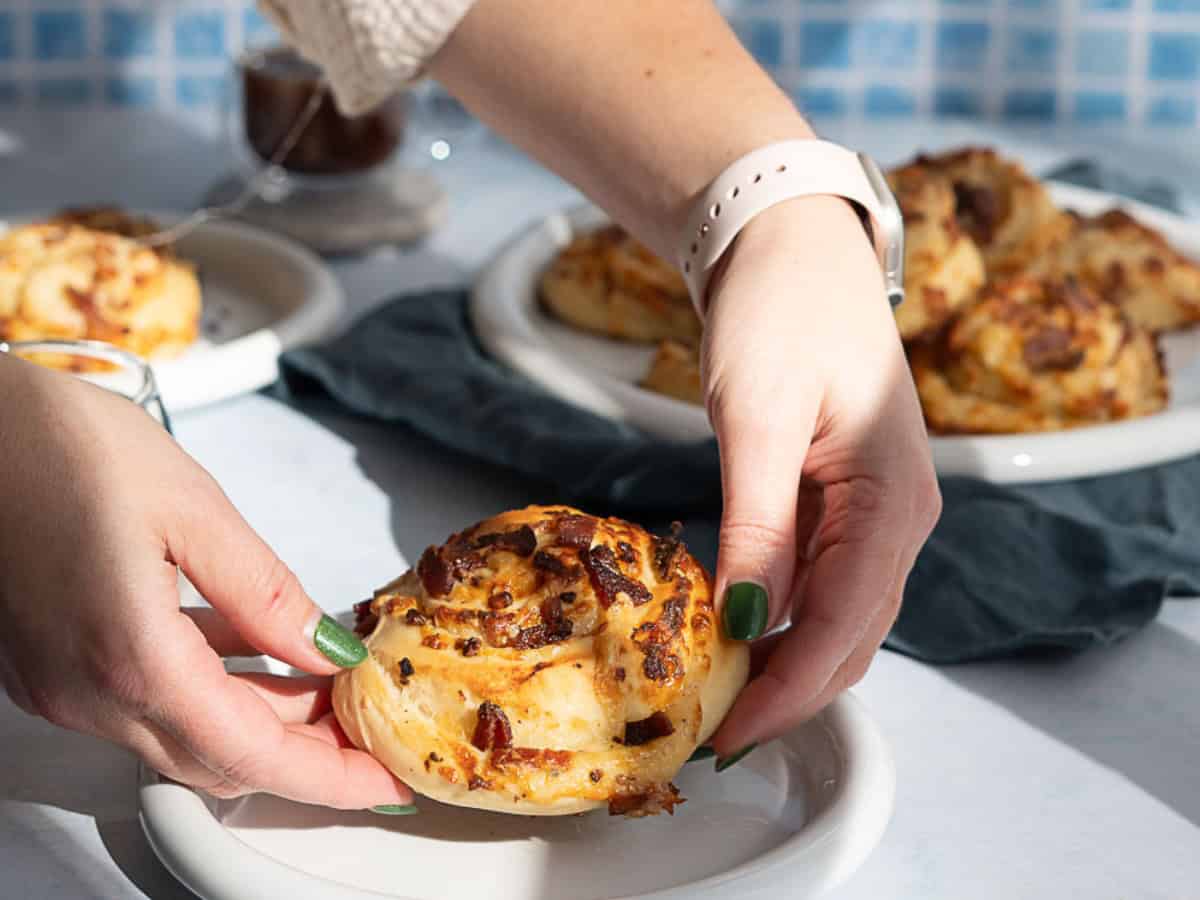
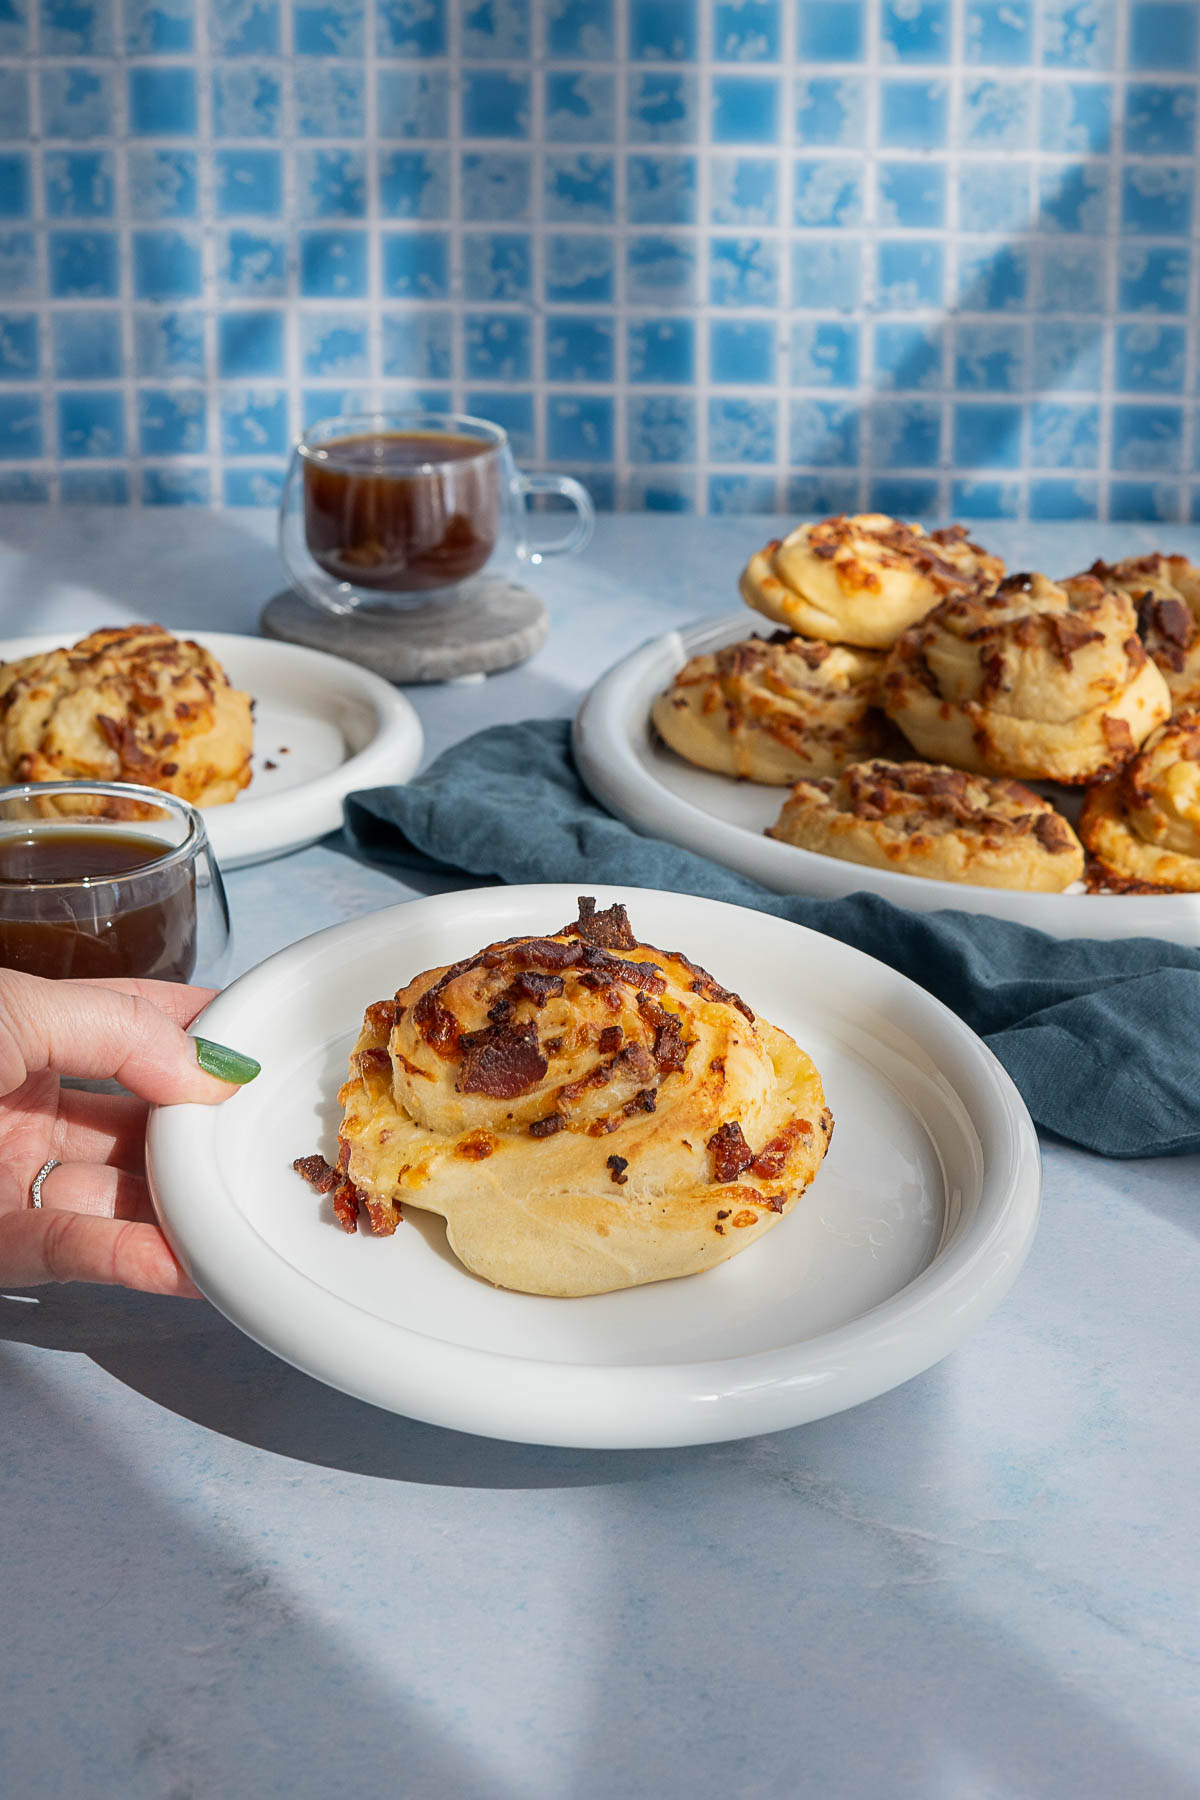
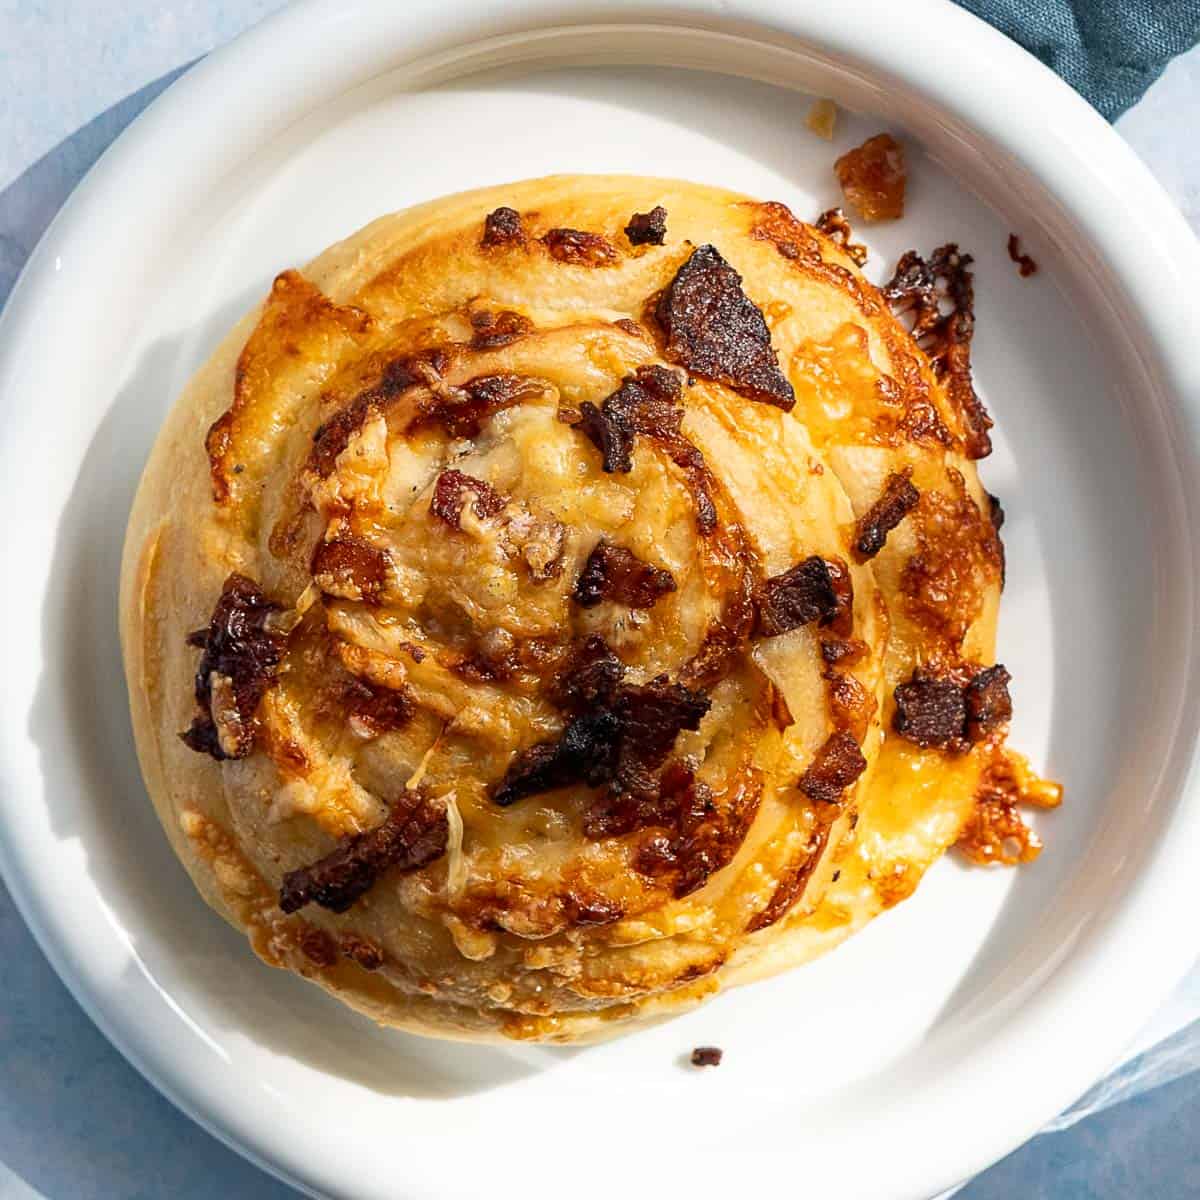
Are you looking for the perfect breakfast bake? These bacon and cheese rolls are irresistible savory breakfast pastries with tender, crispy layers wrapped around creamy béchamel sauce, melted Gruyère, and smokey bacon bits.

These golden-brown spirals are perfect for lazy Sunday brunch with mimosas or as appetizer-sized bites for your next holiday gathering. Customize them to be as big as your face or bite-sized, it’s totally up to you! Like a few other recipes on the site (the Dagobah Slug Slinger drink, these classic krispie treats…), the inspiration for these rolls comes straight from Walt Disney World.
📚the backstory of baking this Disney snack at home
(aka everyone’s favorite part of food blogs!)
This snack, also known as Roule Lard Et Fromage from Les Halles Bakery in the France Pavilion, was one of my absolute favorite ways to start any Epcot day! Nothing was better than a quick, cheesy, bacony snack and a mimosa! The best Disney days would start with one of these and a mimosa, AND it used to cost under $17 for both! Unfortunately, those days are long gone (the snack and the price point…).
The current version at Epcot is basically just a regular dinner roll with a sad piece of bacon and a tiny helping of shredded cheese baked on top for $8.25 (up from $4.25!!!). You don’t even wanna know the price jump on the mimosa. So if you’re keeping score: the flavor went down, the portion size went down, and the price went up. 😫

While you may think that all is lost, there’s a best-kept Disney secret most folks don’t know about: you can actually email or call Disney World and they’ll share recipes with you. It doesn’t work 100% of the time (sometimes they direct you to their own blog with watered-down versions of in-park favorites), but I thankfully had success hacking this recipe! The recipe they shared with me was the scaled-up restaurant version, but it gave me juuust enough information to develop this recipe.
After three years of testing (yep, I’m that dedicated), I dare say this homemade version is even better than what they had at Epcot, because you can customize it exactly how you want. No theme park ticket required, and it comes out at a fraction of theme park pricing!
👀 the secret sauce…
✨ the flavor: This recipe hits The Feels, The Oomph, and The Wow Mom Flavor Factors! A homemade béchamel sauce (one of the mother sauces!) keeps the interior perfectly moist, tender, and chewy without being too saucy. The fluffy bread dough serves as the perfect base, holding up to the flavorful béchamel, perfectly melted Gruyère, and crunchy savory bacon bits. Pretty much a warm and cheesy hug in food form!
🎯 the method: I will not lie to you, this is a straight up project bake, taking multiple days and steps, but it’s fairly simple in execution, like a savory version of a cinnamon roll! You make the dough, cook the bacon, shred the cheese, make the béchamel sauce, then roll the dough out, smear it with béchamel sauce, sprinkle on a hefty serving of shredded Gruyère and crispy bacon, then roll it up, slice, rise, and bake. PHEW!
🏆 the win: These rolls are an all-in-one breakfast that’s stunning presentation-wise and packed with flavor! Plus, these rolls freeze really well, meaning it’s proooobably worth your time to make a double batch and keep them on hand for slow cozy mornings or drop-in guests!
🛒 ingredients

See the recipe card for the exact quantities.
🍳 step-by-step process for making bacon cheese rolls
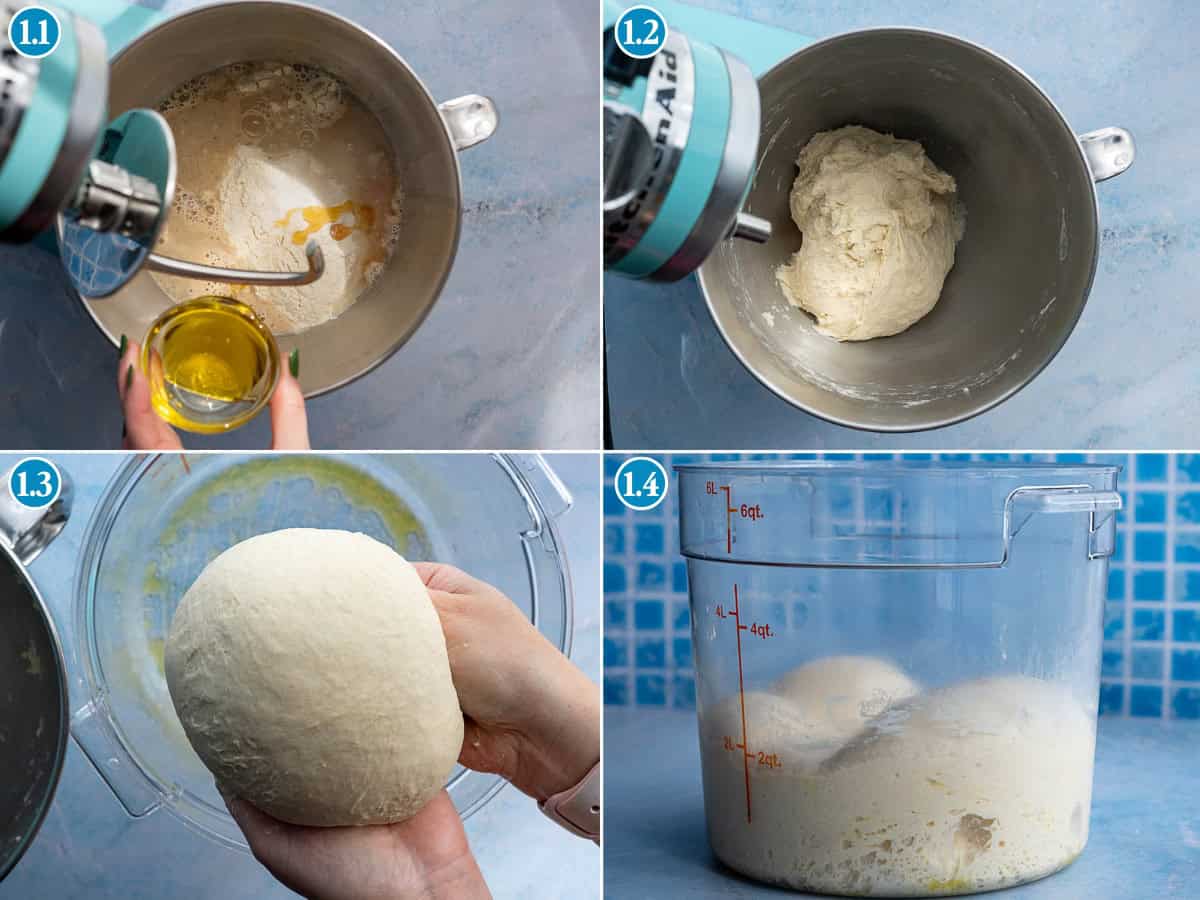
1: Make the dough! Mix all the ingredients for the dough, then put it in a large well-oiled container in the fridge to slow-ferment for up to 48 hours.
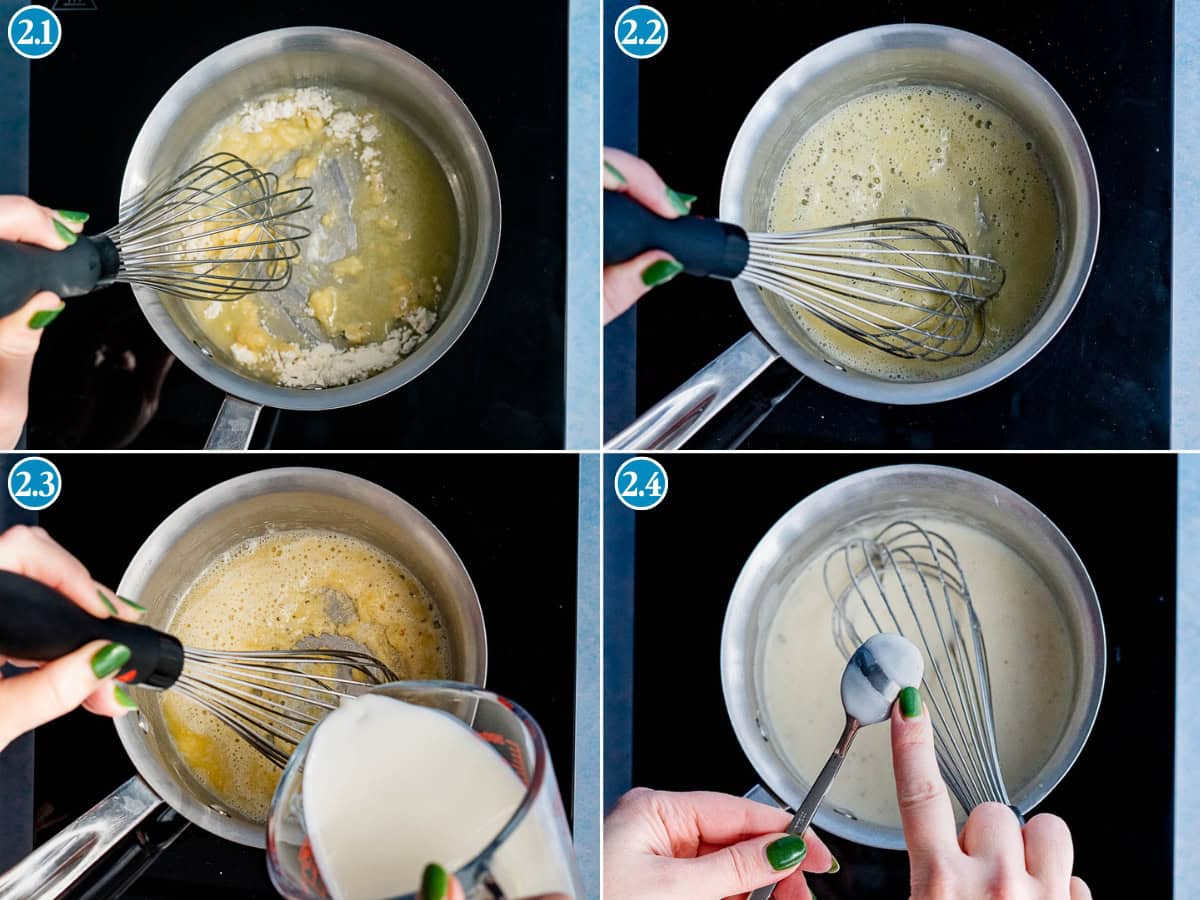
2: Make the béchamel sauce! Gently melt the butter and combine with flour to make a roux, then slowly add milk and season.
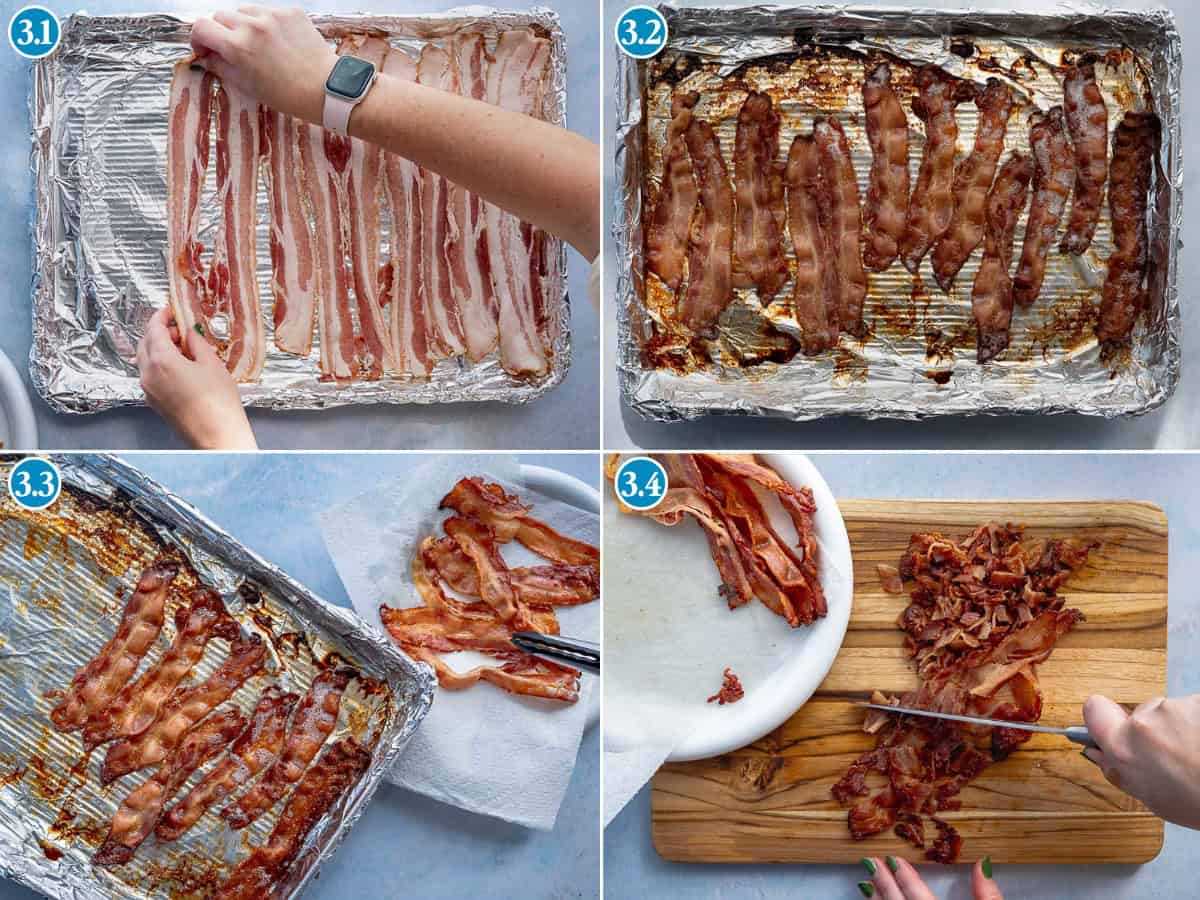
3: Cook the bacon! Line a baking sheet with foil or parchment, and bake the bacon until crisp. Drain the fat and then give it a rough chop.

4: Shred your cheese. PLEASE promise me you won’t use pre-shredded cheese, okay?!
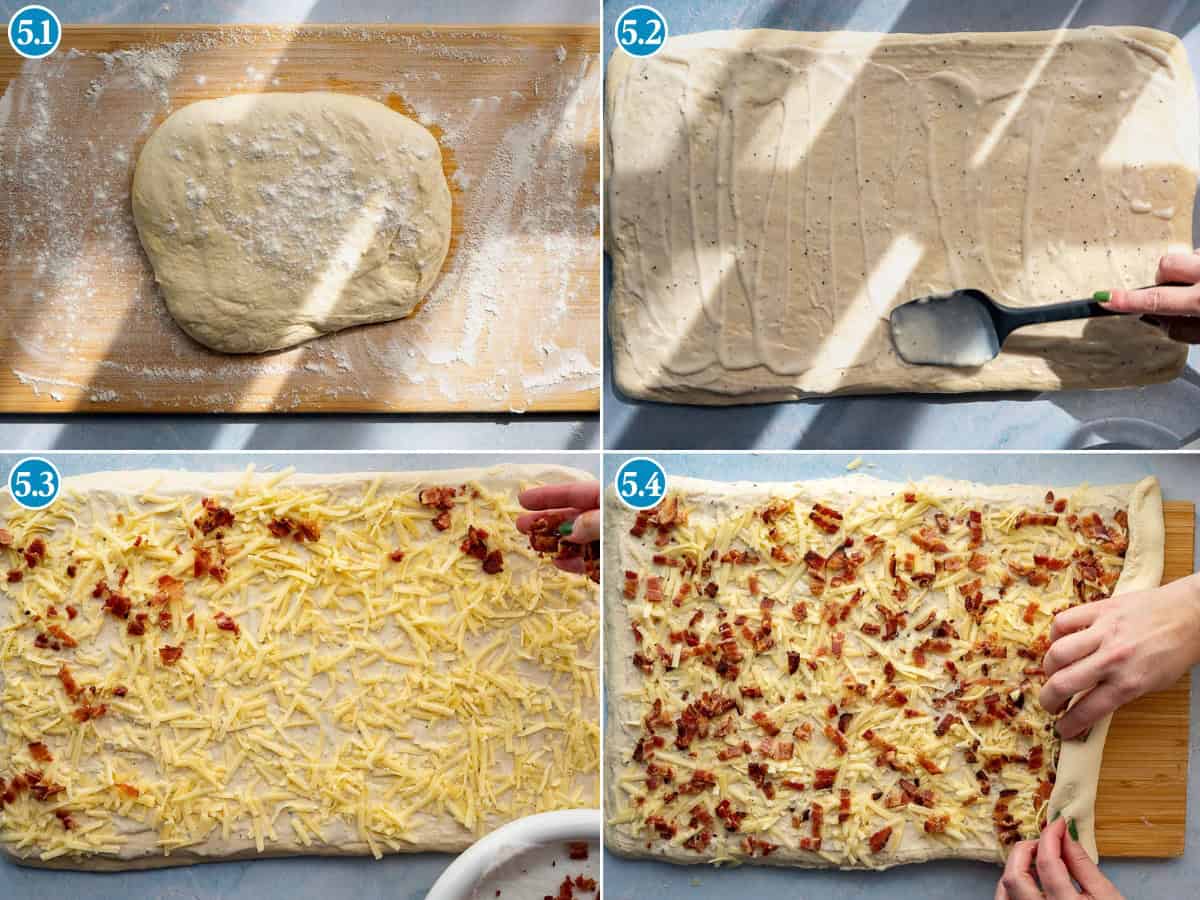
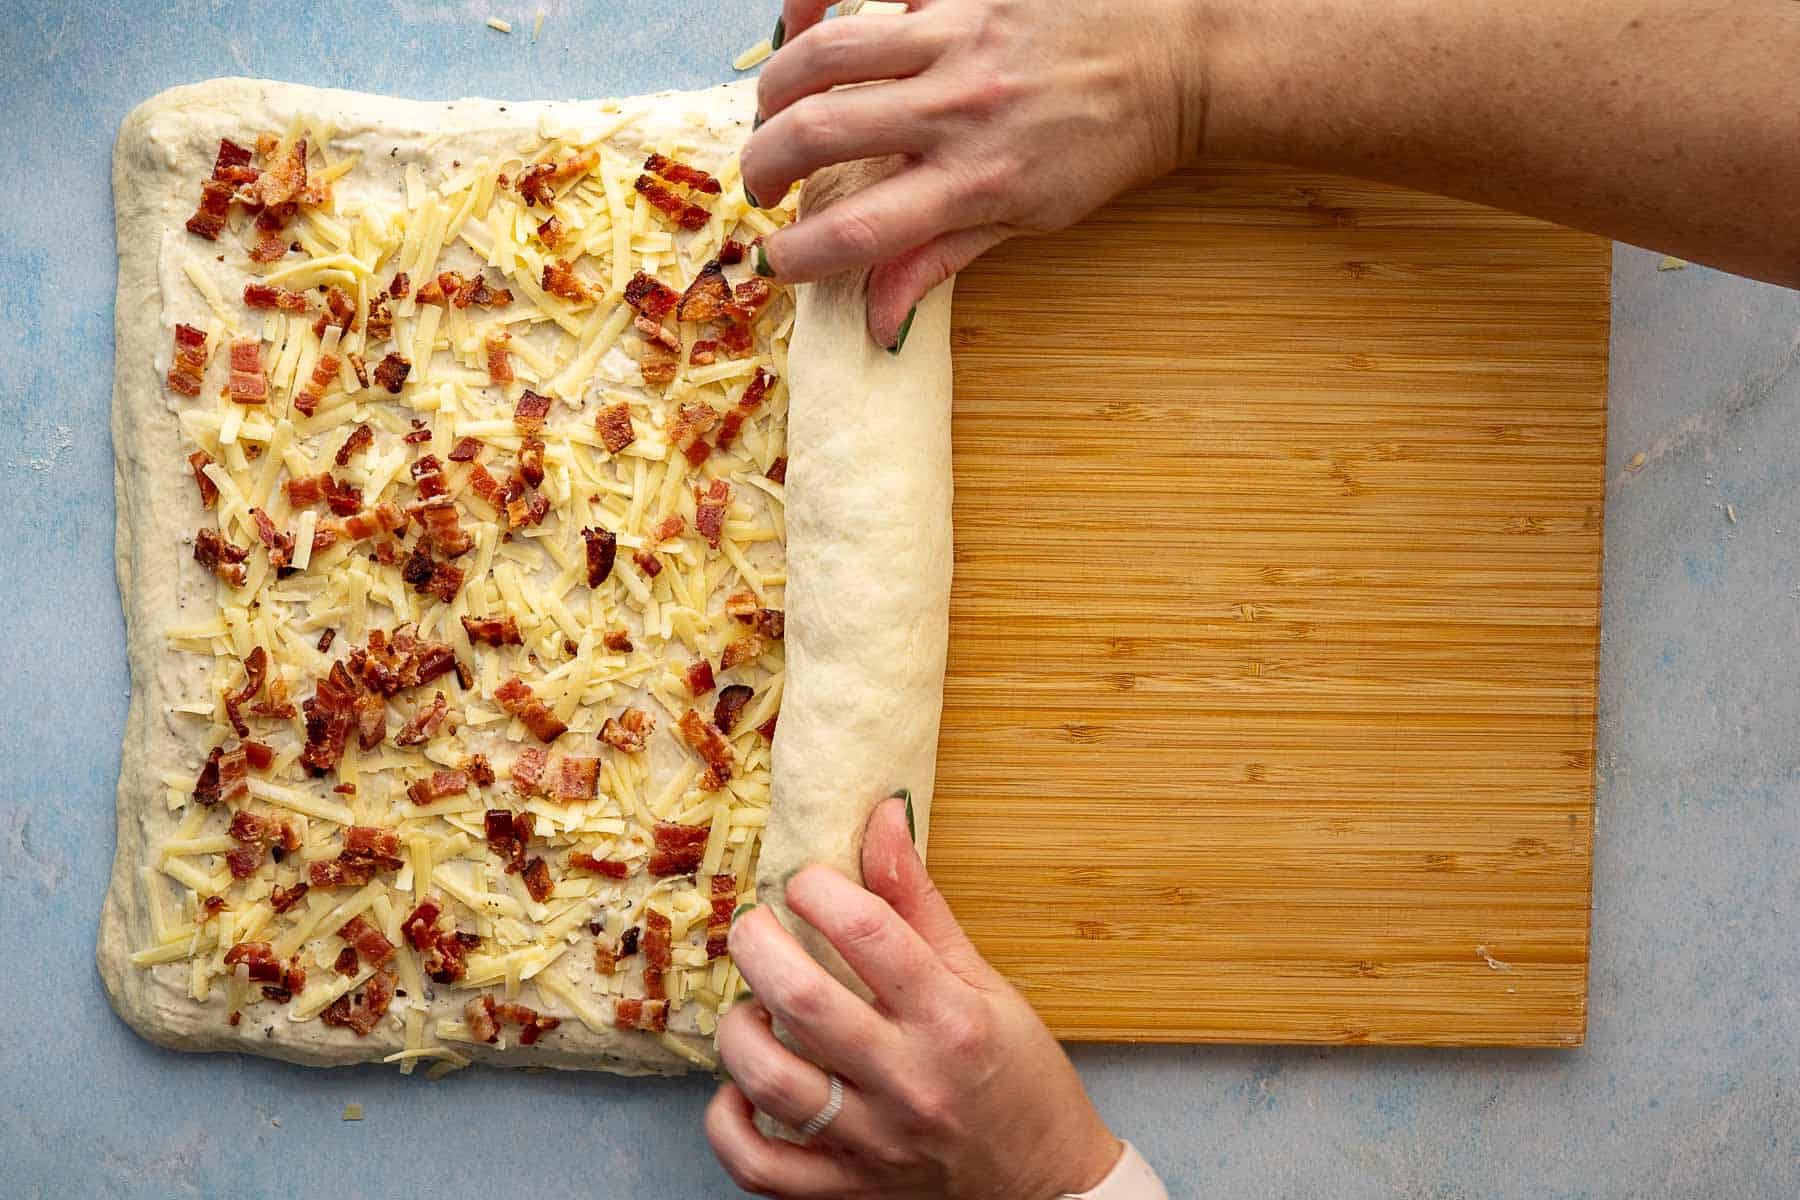
5: Roll out+ assemble! Roll your dough out into a large rectangle, then slater with the sauce and sprinkle on 2/3 of the cheese and bacon, saving some for the tops!
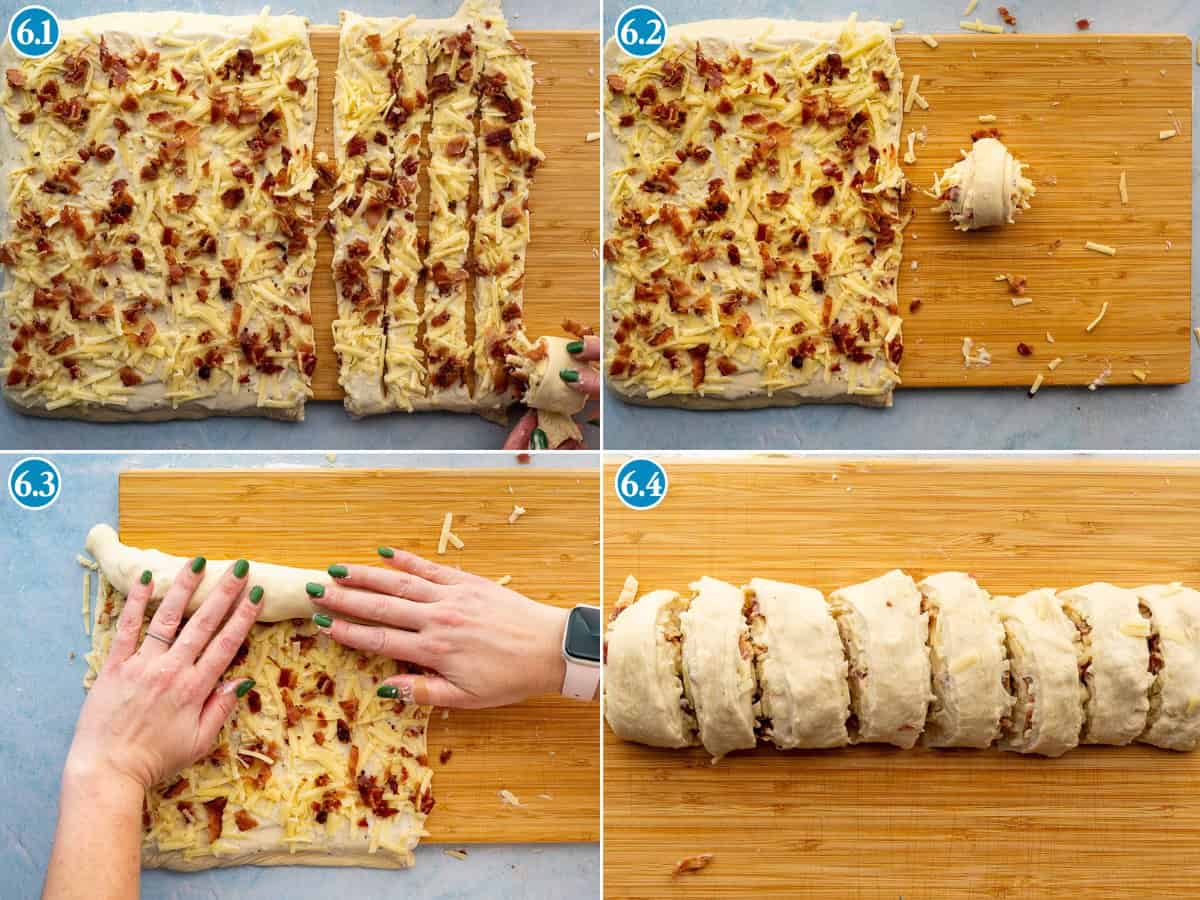
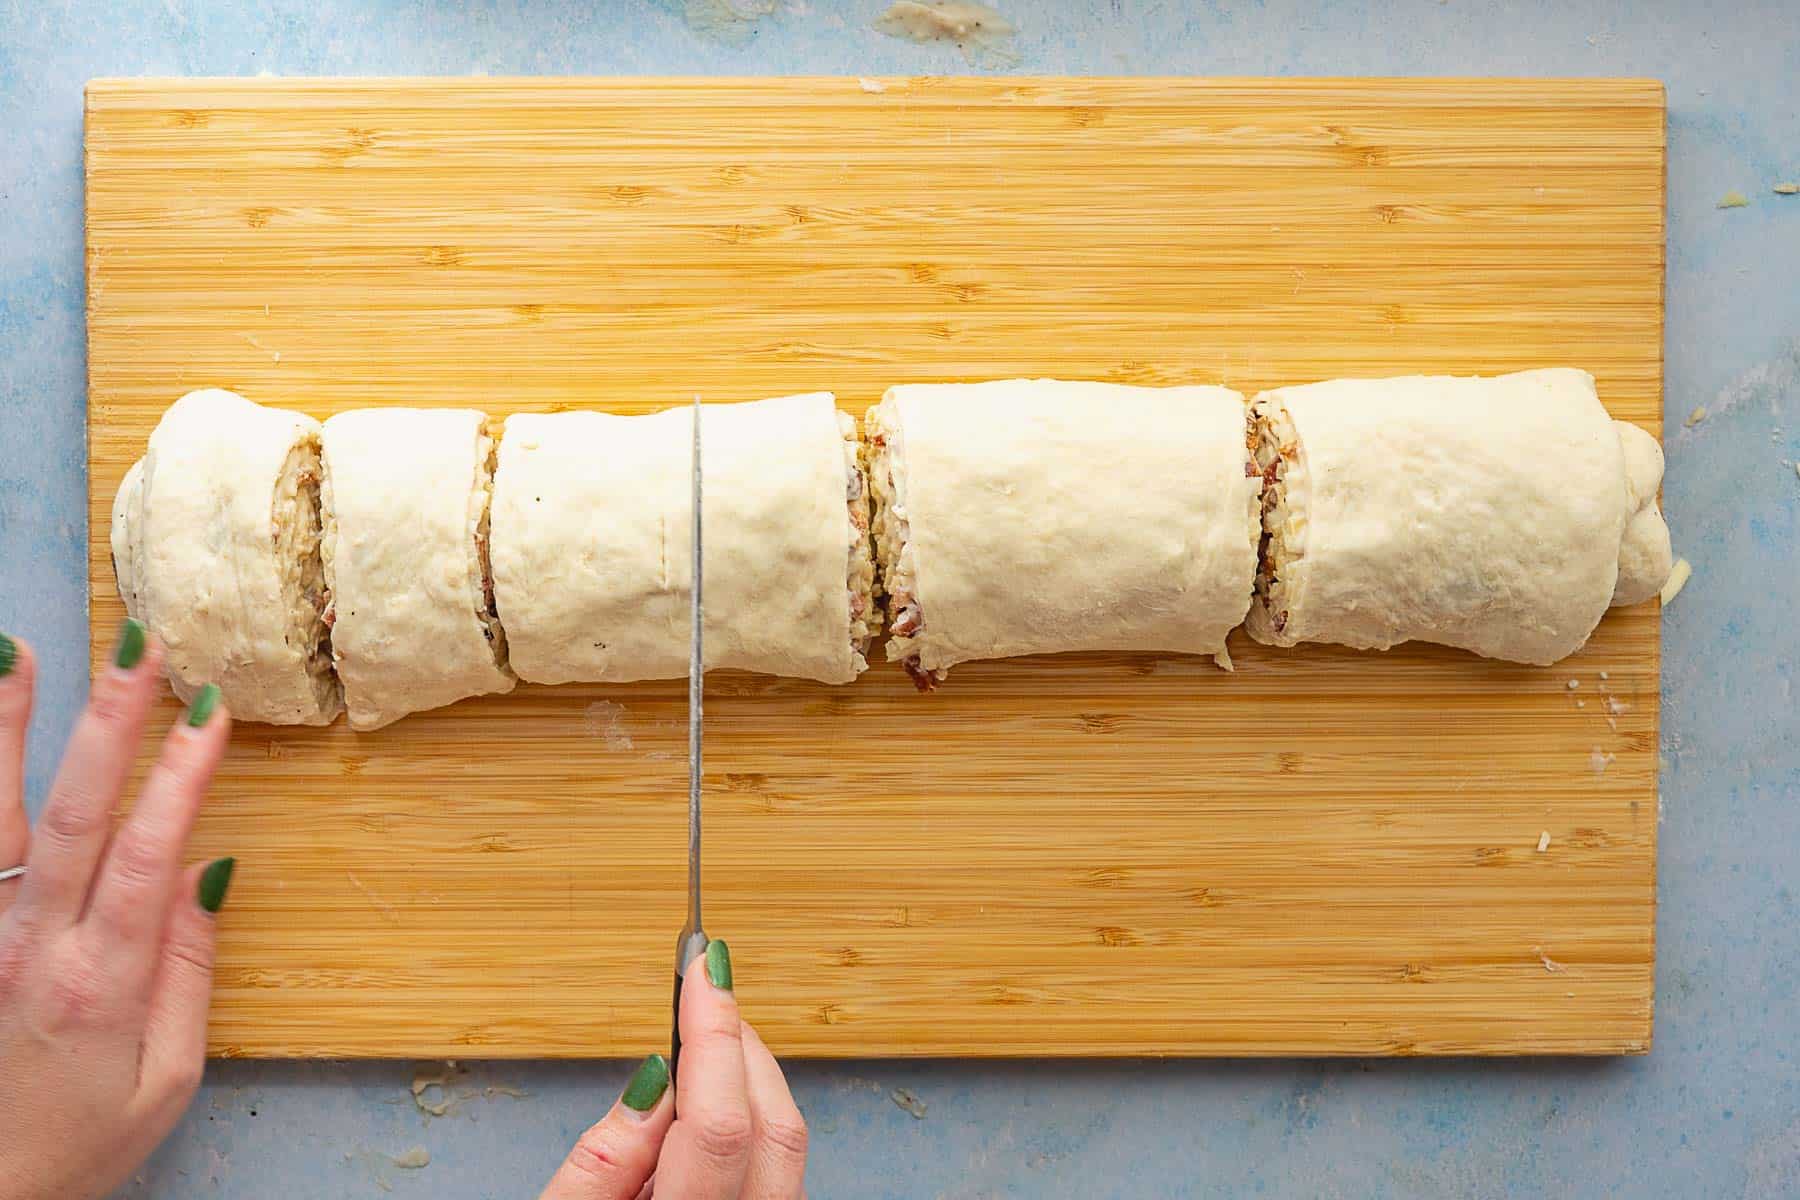
6: Roll up + slice. Roll up your dough then cut out the size you’d like using a serrated knife. You can also cut it into strips first, THEN roll the strips up, shown in 6.1 and 6.2. Use a pizza cutter if you’re going this route!

7: Allow to rise. Cover the dough with saran wrap sprayed with non-stick spray, and allow the rolls to rise for 60-90 minutes, until they almost double in size.

8: Top rolls. Add a sprinkling of the reserved cheese and bacon to the top of each roll.

9: Bake. Bake the rolls until lightly golden brown on top.
10: Serve. Serve your rolls immediately or store them for up to 2 days at room temperature.
💡tips & tricks for getting it right
🔆 top tip
Don’t skip the slow fermentation! The 24-48 hour rest in the fridge allows the flavor to develop and deepen, giving it that sourdough-like tang. It’s a flavor payoff that’s worth the patience.
ℹ️ troubleshooting tips
- dough is too sticky to roll – if your dough is sticking to the counter or rolling pin, lightly dust your work surface and rolling pin with flour. But don’t go overboard—you want just enough to prevent sticking without making the dough dry and tough.
- rolls are browning too fast – if the tops are getting too dark before the centers are fully cooked, tent them loosely with aluminum foil for the last 10-15 minutes of baking. This allows them to finish cooking without burning.
- filling is leaking out – make sure you’re leaving that ½-inch border on the edge without sauce, and seal the seam well when rolling. Also, don’t overfill! A thin layer of béchamel and a generous (but not excessive) amount of cheese and bacon works best.
- rolls didn’t rise properly – if your rolls didn’t double in size during proofing, your kitchen might be too cold. Try proofing them in a warmer spot (like an oven with just the light on) or give them more time. Cold dough straight from the fridge needs that full 60-90 minutes to wake up and rise. Also, be sure to check the expiration date of your yeast! Expired yeast and kitchen temperature are the two most likely culprits for dough that’s not rising.
🍽️ how to serve your bacon cheese rolls
- perfect start – personally, I think these are perfect served with mimosas and a shaken espresso. Nothing says lazy Sunday like coffee and a cheese and bacon-stuffed pastry!
- happy hour – you can also make them smaller appetizer-sized portions for the perfect snack size for your next holiday gathering or party. Serve them alongside a spread of other appetizers like maple roasted sausages and whipped ricotta dip for a truly indulgent tablescape!
- meal prepped – these are wonderful prepared ahead! Check out the freezer tips below for keeping a batch on hand in the freezer!
🧊 freezer tips
These bacon cheese rolls freeze beautifully! For best results, par-bake them until lightly golden but not fully browned. Allow them to cool completely, then store in an airtight freezer bag for up to 3 months.
To reheat, place frozen rolls in a preheated 350°F oven for 15-20 minutes until heated through and golden brown. For even better results, add a small pan of water to the oven to create steam, which keeps the rolls moist and tender. You can also use a steam oven if you’ve got one!
It’s proooobably worth your time to make a double batch and keep them on hand for slow cozy mornings or drop-in guests!
Wanna save this recipe for later? 📬
♻️ customize your breakfast rolls
- choose your cheese – use classic Gruyère, or swap in sharp or flavored cheeses like aged Emmental for even more punch.
- season it up – add everything bagel seasoning, red pepper flakes and garlic, or herbs like basil, rosemary, and oregano for extra flavor.
- béchamel batch – mix up a larger batch of béchamel to use later in the week for lunch or dinner. It’s a perfect base sauce for garlic and Parmesan sauce, which goes great on pasta or pizza!
- size it up – you get to choose whether you want smaller appetizer-sized rolls, pinwheel style, or gigantic meal-replacement sized buns! For smaller rolls, slice your dough in 1-inch or smaller increments. For larger buns, cut portions into 2-2.5 inch slices! Also, how you roll your dough matters:

Rolling your dough up “hamburger style” or top-to-bottom will yield FEWER layers and THINNER rolls.
Rolling your dough up “hot dog style” from side-to-side will yield MORE layers and THICKER rolls.
For BIG, evenly sliced rolls, cut the entire log of dough in half first, then proceed to cut each section from there in half!
🧰 equipment needed & storage tips
🫙 how to store your finished bacon cheese rolls
Store leftover bacon cheese rolls in an airtight container at room temperature for up to 2 days. For longer storage, keep them in the refrigerator for up to 5 days.
To reheat, place rolls in a preheated 350°F oven for 8-10 minutes until warmed through and the exterior crisps back up. You can also microwave individual rolls for 20-30 seconds, though the texture won’t be quite as crispy.
Want the BEST reheating experience?! Create a makeshift steam oven! Add a small shallow pan of water to the oven while reheating to create steam, which keeps the rolls moist and tender on the inside while maintaining that perfect crispy exterior. Or toss a few ice cubes into the oven as you’re reheating, Julia Child style. 👩🏻🍳
💬 q+a
🐭 explore MORE Disney-inspired recipes!


If you make this recipe, please leave a review in the comments and a star rating!
⭐️⭐️⭐️⭐️⭐️
I read every single comment, and each rating is helpful to other readers, too! 🥹
I also love connecting on social media, so snap a pic and hashtag it #myrecipeforfun and tag me on YouTube, TikTok, Threads, or pin this recipe on Pinterest!
Bacon and Cheese Rolls (Copycat Roule Lard et Fromage from Epcot’s France Pavilion)
Wanna save this recipe for later? 📬
Equipment
- stand mixer or large bowl
- Rolling Pin
- serrated knife
- baking sheet
- small saucepan + whisk
- plastic wrap + nonstick spray
Ingredients
Béchamel Sauce
- 22 g unsalted butter 1-1/2 TBSP
- 15 g flour 1-1/2 TBSP
- 150 g milk 2/3 cup
- 2 g salt 1/2 tsp
- pepper 1/4 tsp
Bread Dough
- 420 g bread flour 3-1/2 cups
- 237 g water lukewarm, 1 cup
- 8 g instant yeast 2-1/4 tsp
- g honey 2 tsp
- 7 g salt 1-1/2 tsp
Filling
- 340 g thick-cut bacon one 12-ounce package
- 280 g gruyere cheese shredded, about 10 ounces of cheese
Instructions
Make the Dough
- Combine & mix ingredients. Mix all ingredients but the salt into a shaggy dough, just until the ingredients have come together.420 g bread flour, 237 g water, 8 g instant yeast, g honey
- Rest the dough. Let sit for 15-20 minutes to let the flour absorb the water. This helps the dough become more stable, and easier to work with.
- Add the salt. Add the salt & mix the dough on low speed in a stand mixer until the dough comes together.7 g salt
- Mix until dough clears the bowl. The dough will come clean off the sides of the bowl, but it may still stick to the bottom of the mixer. It will be soft and slightly sticky. This should take about 5 minutes at a medium-low speed.
- Dough too sticky? If the dough is too sticky, add more flour, 1/4 cup at a time.
- Dough too dry? Add more water, 1-2 TBSP at a time.
- Rest dough. Lightly coat a bowl or dough bucket with olive oil or nonstick spray, and rest the dough, covered, in the fridge, for up to 48 hours. This cold ferment allows the dough to develop flavor!
Make the Béchamel Sauce
- Measure + prep milk. Take the milk out of the fridge and measure while you’re making the roux. This helps to remove the chill from the fridge, which helps it incorporate into the hot roux base easier.
- Melt butter. Melt the butter on medium-low heat in a small saucepan.22 g unsalted butter
- Add flour to make roux. Add the flour, stirring to combine, and cook on medium-low heat for 5-10 minutes until the roux starts to turn a golden brown. Be careful not to let it burn, turning the heat down if it starts browning too fast.15 g flour
- Add milk. Slowly stream the milk in, whisking quickly as you do to prevent large clumps from forming as you’re pouring.150 g milk
- Cook to thicken. Allow the sauce to cook and thicken at medium heat. Cook it until it coats the back of a spoon.
- Season + cool. Season with salt and pepper, tasting as you go to make sure the flavor is balanced. Allow the sauce to cool off the heat, then store it in an airtight jar in the fridge while you make the dough.2 g salt, pepper
Cook Bacon + Shred Cheese.
- Preheat oven + prep pan. Preheat oven to 450º F and line a rimmed baking sheet with aluminum foil.
- Bake. Place strips of bacon onto the lined baking sheet and bake in the oven for 15-25 minutes, until cooked but not super crispy.340 g thick-cut bacon
- Shred cheese. While the bacon is cooking, shred the cheese. Set 1/3 of the cheese aside to top the rolls with.280 g gruyere cheese
- Drain + chop bacon. Drain the bacon on paper towels or an oven rack until cooled, then roughly chop it into 1/4-1/2 inch pieces. Set 1/3 of the bacon aside to top rolls with, the rest will be put inside the buns.
- Refrigerate reserved cheese and bacon. Store the reserved 1/3 of the cheese and bacon in a sealed container in the fridge while the rolls rest and rise.
Assemble + Bake Rolls.
- Roll dough. Remove the dough from the fridge and roll it out into a rectangle, about 1/4 inch thick. The rectangle should be about 15 inches by 12 inches, or slightly larger.
- Spread sauce. Gently spread the béchamel sauce onto the dough, leaving about 1/2 inch of a border at the free edge.
- Sprinkle cheese + bacon. Generously sprinkle 2/3 of the shredded cheese and 2/3 of the bacon onto the dough, taking care to leave the free edge without toppings.
- Roll + slice. Roll the dough up tightly into a log, making sure to pinch the free edge to seal the dough together. Slice into 1-1/2 – 2-inch slices, depending on how large you want the rolls to be. See slicing notes for more details!
- Rest + rise. Place rolls in a parchment paper or non-stick sprayed pan, a few inches apart. Cover with a sheet of plastic wrap sprayed with non-stick spray and allow the rolls to rise for 30-60 minutes, or until they are almost doubled in size.
- Preheat oven. 30 minutes before the rise is finished, preheat the oven to 425ºF.
- Add reserved toppings + bake. Sprinkle the rolls with the reserved cheese and bacon, then bake for 20 – 25 minutes, until the rolls are golden brown in color and the cheese is melty on top.
- Cool, serve, + store. Allow the rolls to cool for 5 -10 minutes, then serve. Once fully cooled, store in an airtight storage container for 2-3 days at room temperature, or freeze for longer storage.
Notes
🔆 top tip
Don’t skip the slow fermentation! The 24-48 hour rest in the fridge allows the flavor to develop and deepen, giving it that sourdough-like tang. It’s a flavor payoff that’s worth the patience.ℹ️ troubleshooting tips
- dough is too sticky to roll – if your dough is sticking to the counter or rolling pin, lightly dust your work surface and rolling pin with flour. But don’t go overboard—you want just enough to prevent sticking without making the dough dry and tough.
- rolls are browning too fast – if the tops are getting too dark before the centers are fully cooked, tent them loosely with aluminum foil for the last 10-15 minutes of baking. This allows them to finish cooking without burning.
- filling is leaking out – make sure you’re leaving that ½-inch border on the edge without sauce, and seal the seam well when rolling. Also, don’t overfill! A thin layer of béchamel and a generous (but not excessive) amount of cheese and bacon works best.
- rolls didn’t rise properly – if your rolls didn’t double in size during proofing, your kitchen might be too cold. Try proofing them in a warmer spot (like an oven with just the light on) or give them more time. Cold dough straight from the fridge needs that full 60-90 minutes to wake up and rise. Also, be sure to check the expiration date of your yeast! Expired yeast and kitchen temperature are the two most likely culprits for dough that’s not rising.


